 Save
Save My neighbor brought over a tin of these guava jam bars last summer, still warm from her oven, and I bit into one expecting something ordinary—instead, the buttery crumble gave way to bright, jammy sweetness that tasted like a Caribbean vacation in bar form. I had to ask for the recipe immediately, and when I made them for the first time, my kitchen filled with this warm, honeyed aroma that had everyone gathering around before they were even cool. There's something about the tropical guava that transforms a simple shortbread into something that feels fancy without any fuss.
I remember bringing a batch to a potluck where everyone was bringing the usual brownies and cookies, and watching people's faces light up when they tasted the guava filling was honestly the best part of my week. One friend actually asked if I'd bought them from a bakery—that moment of "wait, you made these?" never gets old.
Ingredients
- All-purpose flour: The foundation that keeps everything tender and crumbly; don't sift unless your flour has been sitting around for months and has compacted.
- Granulated sugar: Dissolves into the dough, creating that sandy, cookie-like texture that crumbles beautifully.
- Baking powder: Just enough to give the bars the slightest lift so they're not too dense, but you won't notice it's even there.
- Salt: A pinch that makes the guava filling taste even brighter and more complex.
- Unsalted butter, cold and cubed: This is non-negotiable—cold butter stays distinct in the dough, creating those little pockets that make the texture crumbly rather than cakey.
- Large egg: Binds everything just enough without making the bars cake-like; room temperature works best if you have time.
- Vanilla extract: A subtle backdrop that lets the guava be the star.
- Guava jam or guava paste, softened: The heart of these bars, so use something you'd actually eat straight from a spoon—quality matters here since it's the filling.
Tired of Takeout? 🥡
Get 10 meals you can make faster than delivery arrives. Seriously.
One email. No spam. Unsubscribe anytime.
Instructions
- Set the stage:
- Preheat your oven to 350°F and line that 8x8-inch pan with parchment paper, making sure you have a little overhang on two sides so you can lift the whole thing out later without it crumbling apart.
- Build the dry mix:
- Whisk together your flour, sugar, baking powder, and salt in a large bowl—this takes just about a minute and makes sure the baking powder is evenly distributed so you don't get any bitter pockets.
- Add the butter magic:
- Scatter your cold, cubed butter over the flour mixture and use a pastry cutter (or honestly, your fingertips work just fine) to blend everything together until it looks like coarse, damp sand. This is where the crumbly texture comes from, so don't overmix—stop as soon as there are no visible flour streaks.
- Bring it together:
- Add the egg and vanilla extract and stir just until a shaggy dough forms; it should look a little rough and crumbly, not smooth and polished.
- Press the foundation:
- Take about two-thirds of your dough and press it firmly and evenly into the bottom of the prepared pan, working it up the sides just slightly so the jam has something to nestle into.
- Spread the jam:
- Gently spread the guava jam over the base layer, leaving about a half-inch border around the edges so it doesn't leak out the sides while baking. You can use an offset spatula or the back of a spoon, whichever feels more natural in your hand.
- Top it off:
- Crumble the remaining dough over the jam layer—don't press it down, just let the little nuggets of dough sit on top, creating peaks that will turn golden.
- Bake until golden:
- Slide the pan into the oven for 35 to 40 minutes until the top is lightly golden and the jam just barely bubbles at the edges. Your kitchen will smell incredible, and that's your signal you're close.
- Cool with patience:
- Let the bars cool completely in the pan before you even think about cutting them—this takes at least an hour or two, but it's worth the wait because warm bars will crumble everywhere.
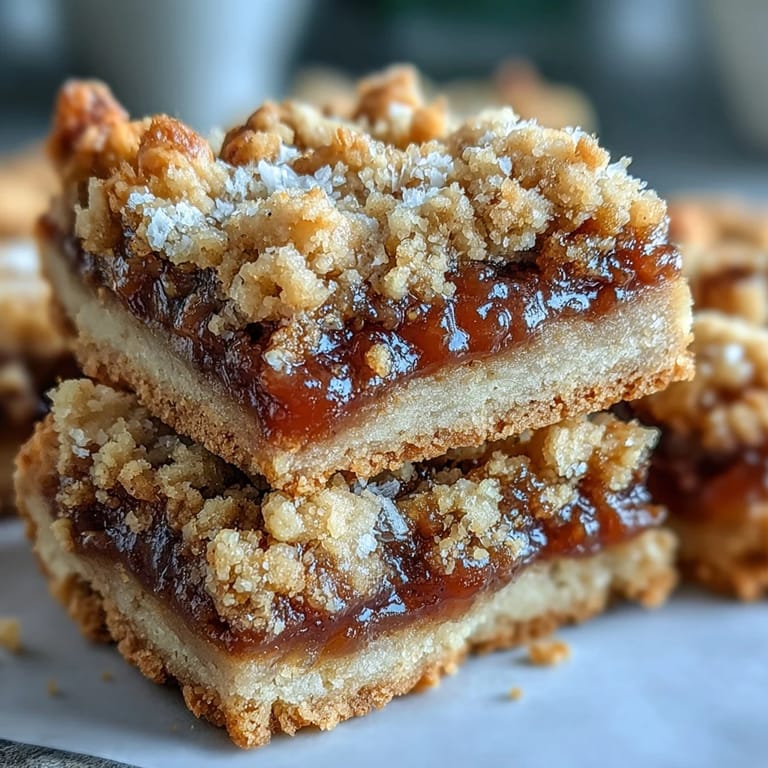
 Pin it
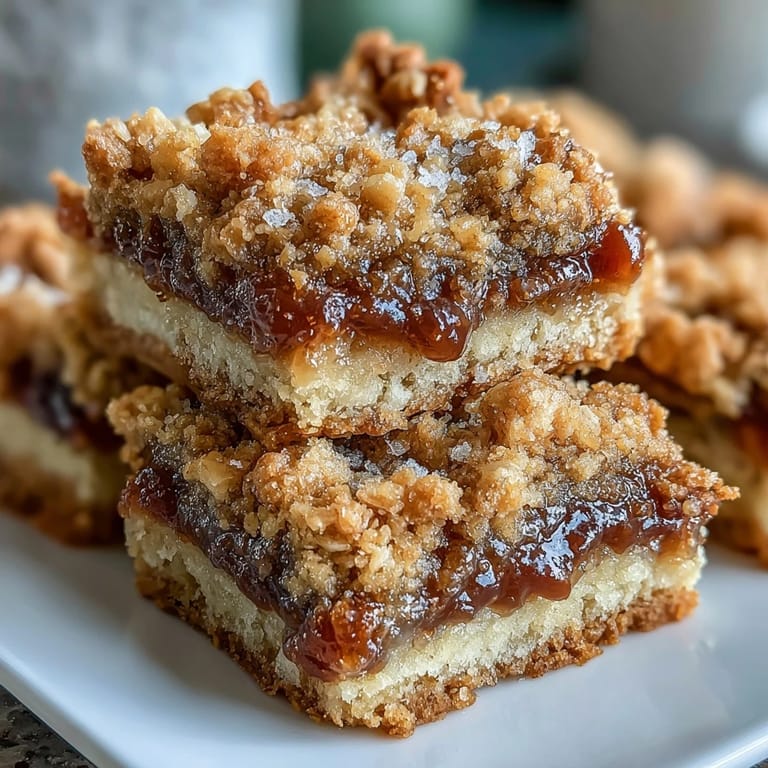
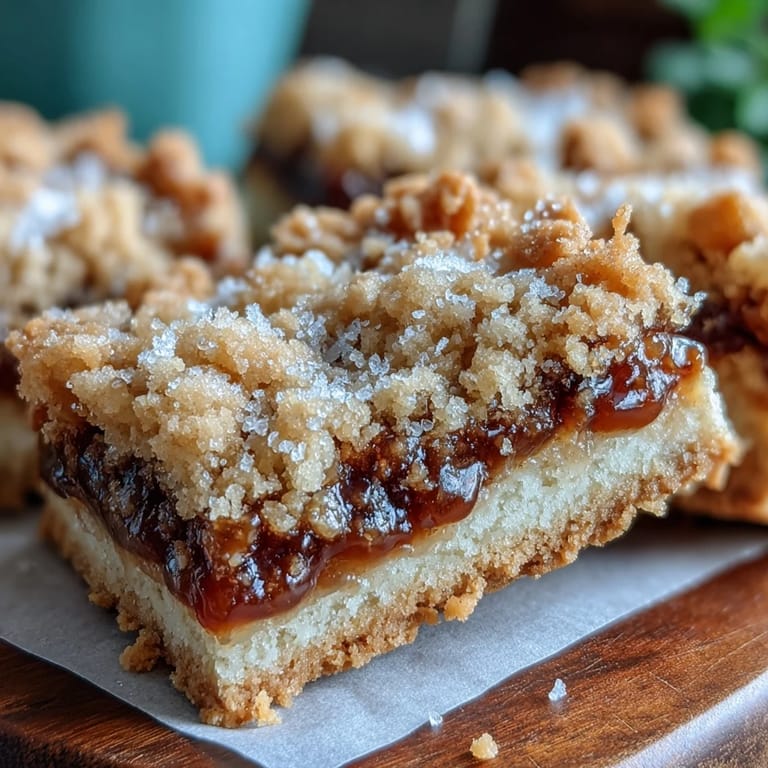
 There's something deeply satisfying about cutting into these bars and seeing that perfect striation of golden crumble, jammy middle, and buttery base all lined up neatly. My daughter now requests these instead of birthday cake, which tells you everything you need to know about how good they are.
When Texture Is Everything
The magic of these bars lives in the contrast between layers—the crumbly top and base against the smooth jam filling. I've made them with slightly softened butter before, and the texture becomes more cakey and less crumbly, so that cold butter really is the secret. Even a few minutes of planning ahead to cube your butter and leave it on the counter for just long enough makes a real difference.
Trading Guava for What You Have
While guava is incredible, I've made these with apricot jam on days when guava wasn't in my pantry, and they're equally delicious in a completely different way. Raspberry or mango work beautifully too—pick a jam you love eating straight from the spoon, and you've found your perfect filling. The cookie base and streusel stay exactly the same, so you can experiment without changing a thing.
Storage and Serving Secrets
These bars actually taste better after sitting overnight because the flavors meld and the texture sets just right, so making them a day ahead is your friend. They keep in an airtight container at room temperature for about four days, though honestly they never last that long in my house. Serve them plain with coffee, or go full indulgence and pair them with a scoop of vanilla ice cream for dessert—either way, they elevate a simple afternoon or the end of a meal.
- Store in an airtight container at room temperature for maximum freshness and to keep that crumbly texture from getting soft.
- For extra crunch, fold about half a cup of chopped toasted nuts (pecans or almonds are my go-to) into the remaining dough before you crumble it over the jam.
- These bars freeze beautifully for up to two months, so make a double batch when you have the time.
 Pin it
 These guava jam bars have become my go-to when I want to impress without stress, and honestly, that's the kind of recipe that changes your life in the best, most delicious way. One bite and you'll understand why my neighbor's tin showed up at my door in the first place.
Frequently Asked Questions
- → Can I use fresh guava instead of jam?
Fresh guava has too much moisture for these bars. Stick with jam, paste, or preserves to maintain the proper texture and prevent a soggy center.
- → How do I know when the bars are done baking?
The streusel topping should be light golden brown and set. The center may still appear slightly soft from the jam, but it will firm as it cools.
- → Can I make these ahead of time?
Yes, these bars keep well for up to 5 days in an airtight container at room temperature. You can also freeze the uncut bars for up to 3 months.
- → What other fruit fillings work well?
Apricot, raspberry, mango, or pineapple jam all make excellent substitutes. Choose a thick, high-quality preserve to prevent the filling from becoming too runny.
- → Why must I let them cool completely before cutting?
Cutting while warm causes the bars to crumble and the jam layer to ooze. Cooling allows the streusel to set and the filling to firm for clean, neat slices.
- → Can I double this recipe for a 9x13 pan?
Yes, double all ingredients and bake in a 9x13-inch pan. The baking time may increase by 5–10 minutes—check for golden topping.