 Save
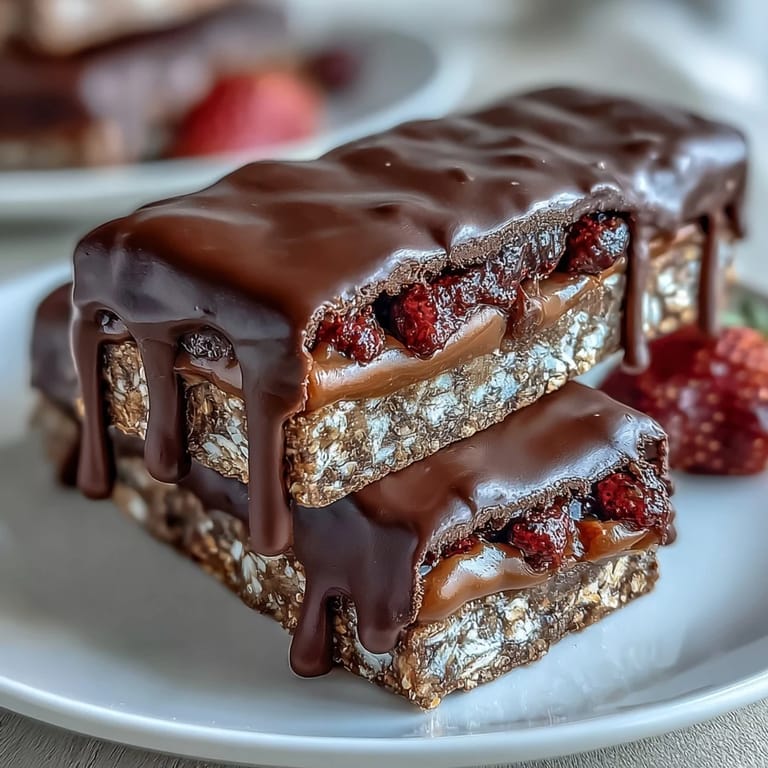
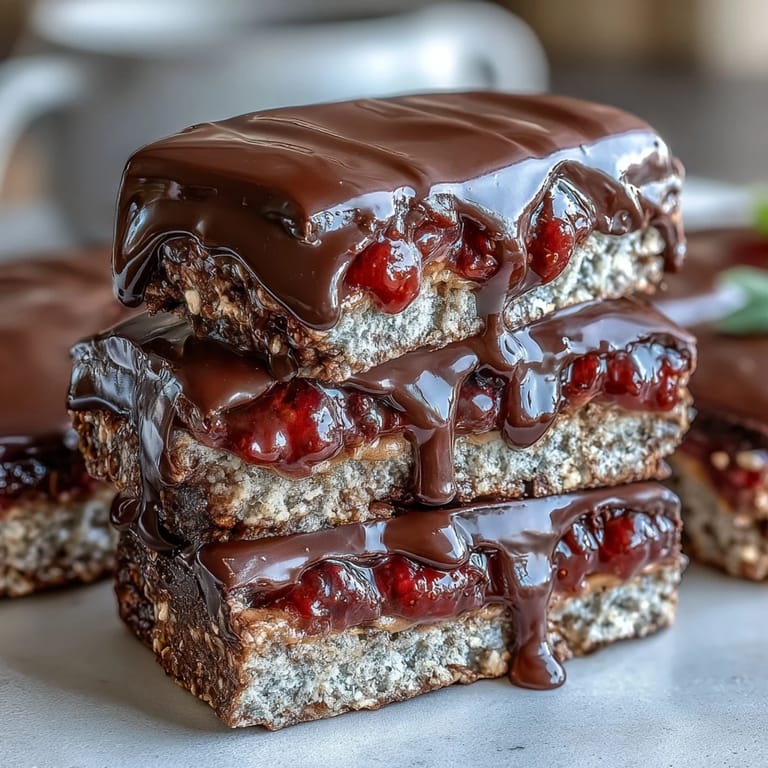
Save My neighbor showed up one afternoon with a container of these bars, and I remember thinking they looked too elegant for something made without an oven. She laughed when I asked if she'd baked them, explaining the whole thing came together in her kitchen while her kids played outside. One bite and I understood why she made them every week—that perfect chew of the oats, the bright strawberry middle, and chocolate that snaps when you bite down.
I brought these to a potluck last summer, and they disappeared faster than anything else on the table. A friend who usually skips dessert grabbed three, and later she asked for the recipe because her teenage daughter had started requesting them for school snacks. That's when I realized these bars work as perfectly for a casual Tuesday afternoon as they do for impressing guests.
Ingredients
- Old-fashioned rolled oats: The foundation of everything—buy the thicker kind, not instant, because they give you that satisfying chewiness that holds the bar together.
- Almond flour: This adds richness and helps bind the mixture without needing eggs, but if you're avoiding nuts, oat flour works beautifully.
- Peanut or almond butter: Choose creamy over chunky so the mixture spreads evenly and the flavors blend smoothly.
- Maple syrup or honey: Either works, though maple gives a subtler sweetness that doesn't overpower the strawberry.
- Coconut oil: Melted coconut oil keeps everything moist and helps the bars stay tender even after chilling.
- Strawberry preserves: Low-sugar versions let the actual fruit flavor shine through instead of tasting like pure sugar.
- Freeze-dried strawberries: These add texture and concentrated strawberry taste that jam alone can't quite deliver.
- Semi-sweet or dark chocolate: Semi-sweet is sweeter and more forgiving if you're new to melting chocolate, but dark chocolate pairs beautifully with the berry layer.
Tired of Takeout? 🥡
Get 10 meals you can make faster than delivery arrives. Seriously.
One email. No spam. Unsubscribe anytime.
Instructions
- Set up your workspace:
- Line your 8x8-inch pan with parchment paper, letting it hang over the edges—this is your secret to removing the entire batch without breaking anything. Smooth out the corners so you have a clean base to work on.
- Make the oat base:
- Combine oats, almond flour, nut butter, maple syrup, melted coconut oil, vanilla, and salt in a large bowl. Mix with a spoon or your hands until everything feels sticky and cohesive, like wet sand that holds its shape when you squeeze it.
- Press down the foundation:
- Use two-thirds of this mixture to line the bottom of your pan, pressing firmly with the back of a spoon so it compacts into a single solid layer. The pressure matters here—a loose base will crumble when you cut the bars.
- Spread the strawberry layer:
- Spoon the preserves evenly over the oat base and use the back of your spoon to gently spread it without disturbing the layer below. Scatter your crushed freeze-dried strawberries on top for pops of tart brightness.
- Add the crumble topping:
- Crumble the remaining oat mixture between your fingers and sprinkle it over the jam, gently pressing down so it stays in place. Don't compress it as much as the base—you want it to feel slightly looser and more textured.
- Melt the chocolate:
- Chop your chocolate into small, even pieces and place them in a microwave-safe bowl with coconut oil. Microwave in 30-second bursts, stirring between each interval, until you have a smooth, glossy mixture—this prevents the chocolate from seizing.
- Top with chocolate:
- Drizzle the warm chocolate across the bars in a zigzag pattern, or wait until they're chilled and dip each individual bar for a more dramatic coating. Either approach works, depending on your mood.
- Chill and set:
- Cover the pan loosely and refrigerate for at least two hours until everything feels firm and the chocolate has fully set. You'll know they're ready when you can press the top without leaving a fingerprint.
- Cut and serve:
- Lift the entire slab out using the parchment overhang and place it on a cutting board. Use a sharp knife dipped in warm water (and wiped clean between cuts) to slice into twelve even squares.
 Pin it
 There's something almost meditative about pressing oats into a pan, spreading jam by hand, and watching chocolate set in the fridge. It's the kind of recipe that reminds you that good food doesn't require complicated techniques or hours of work—sometimes it just needs your attention and patience.
Storage and Make-Ahead Magic
These bars are actually better after a day in the fridge because the flavors settle and deepen. I've kept them refrigerated for up to a week in an airtight container, though they never last that long in my house. If you want to make them ahead for a gathering, freeze them for up to three weeks, and they'll thaw to perfect texture in about thirty minutes.
Customizing Your Bars
The beauty of this recipe is how flexible it is without losing its identity. I've tried raspberry and apricot preserves, and both create slightly different flavor profiles while keeping the same structure. The oat base is sturdy enough to handle different nut butters, different chocolate percentages, even different dried berries mixed into the topping.
Why This Recipe Works Every Time
These bars succeed because each layer has a specific job—the oats provide structure, the jam adds moisture and flavor, and the chocolate seals everything together. When you understand why the recipe is built this way, you can adjust it with confidence instead of guessing.
- The two-layer oat approach (bottom and top) prevents the jam from making the bars soggy by keeping it encased.
- Freeze-dried strawberries stay crispy and don't release water like fresh berries would, preserving the texture you're going for.
- Chilling for the full two hours is worth the wait because it lets the coconut oil fully solidify, which gives the bars their snap.
 Pin it
 These bars have become one of those recipes I make when I want to feel like I've done something impressive without spending my whole afternoon in the kitchen. They're proof that simple, honest ingredients and a little patience can create something that tastes far more complicated than it actually is.
Frequently Asked Questions
- → How do I make the oat base sticky enough?
Mix peanut or almond butter with maple syrup and melted coconut oil thoroughly. This combination binds the oats and almond flour, ensuring the base sticks together firmly once pressed.
- → Can I substitute strawberry preserves with other fruits?
Yes, raspberry or apricot preserves work well as alternatives, providing a different fruity flavor while maintaining the layered texture.
- → What is the best way to melt the chocolate topping?
Use a microwave-safe bowl and heat the chocolate with coconut oil in short 30-second intervals, stirring between each until smooth to avoid burning.
- → How long should these bars chill before serving?
Refrigerate for at least 2 hours to allow the bars to firm up and the chocolate topping to set properly.
- → Are there any nut-free options for this treat?
Yes, replace the nut butter with sunflower seed butter and almond flour with oat flour to make a nut-free version while keeping a similar texture.