Save
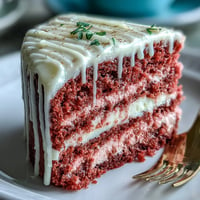
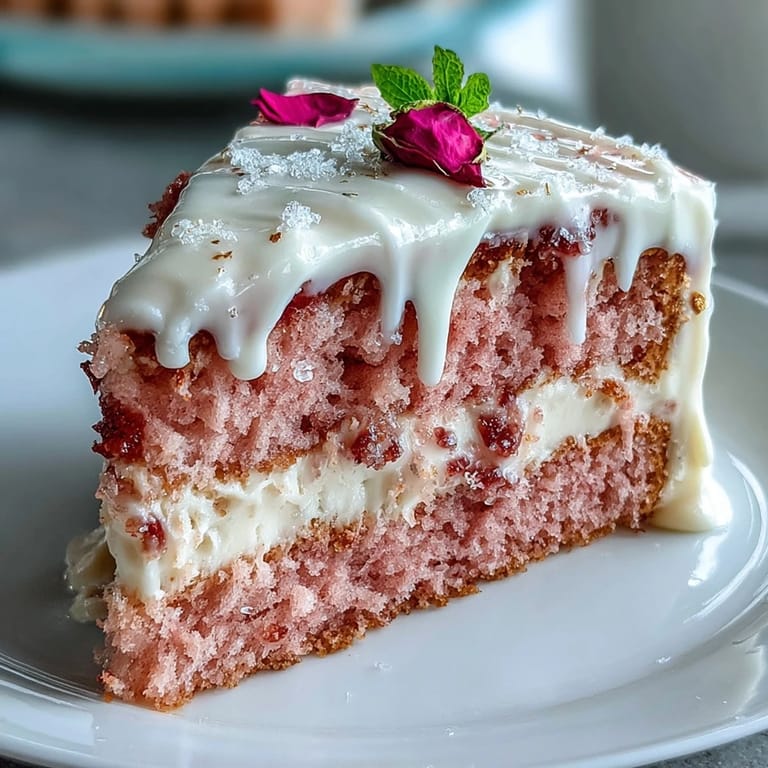
Save The aroma of rosé wafting through my kitchen on a Saturday morning is surprisingly cheerful—almost like opening a fresh bouquet. The first time I attempted this pink velvet cake, I wasn’t planning on baking anything so extravagant, but the upcoming bridal shower begged for something a little more glamorous. There’s a theatrical joy in watching white chocolate drip down buttery cake edges before they’re crowned with golden shimmer. The way the rosé lightly perfumes every bite still catches me off guard. It’s a cake that invites you to linger at the counter, tasting icing from the mixer and smiling at the pink streaks on your hands.
I remember assembling this cake one spring afternoon while my living room filled with laughter and stories from the bridal party. We took turns stirring the batter and sneaking tastes of buttercream, passing between cake pans and playlists. Someone knocked over a bottle of edible glitter, so the dog sparkled for the rest of the week. By the time we glazed the final gold drip, it felt like we’d bottled a bit of that afternoon’s joy into each slice.
Ingredients
- All-purpose flour: Sifting makes the crumb light and keeps the layers tender—don’t skip it, especially for this delicately hued cake.
- Granulated sugar: Creamy sweetness and smooth texture, and measuring carefully prevents the cake from feeling too dense.
- Baking soda: Gives a gentle lift that’s just enough for tall, elegant layers.
- Fine salt: A small pinch teases out the rosy, cocoa flavors.
- Cocoa powder (unsweetened): Just a hint deepens the color and brings complexity without turning it into a chocolate cake.
- Vegetable oil: This keeps the crumb moist and beautifully even, especially important with multiple layers.
- Large eggs: Room temperature eggs mix in smoothly and help the cake rise with a satisfyingly plush structure.
- Buttermilk: Adds a subtle tang and extra tenderness—bring it to room temperature for a silkier batter.
- Rosé wine: Pick a dry or sparkling bottle; its floral notes remain faint but linger delightfully in both cake and buttercream.
- Vanilla extract: I always use my favorite to add roundness to the wine’s gentle bite.
- White vinegar: This might seem surprising, but it reacts with baking soda for a classic velvet crumb.
- Pink or rose gel food coloring: Gel color allows you to achieve a deep, elegant shade without thinning the batter—add sparingly until it makes you smile.
- Unsalted butter: Whip it until it practically glows for an impossibly creamy buttercream.
- Powdered sugar: Sift for airy, lump-free frosting, and adjust slowly to your desired sweetness.
- Heavy cream: Ensures the white chocolate drip is pourable but sets dreamily upon cooling.
- White chocolate chips: Melt smoothly for the base of your showstopping drip—choose a high-quality brand for flavor.
- Edible gold luster dust: Only ever use luster dust labeled as edible—shine is lovely, safety is better.
- Vodka or clear lemon extract: A splash with your luster dust makes the perfect edible gold paint for finishing touches.
Tired of Takeout? 🥡
Get 10 meals you can make faster than delivery arrives. Seriously.
One email. No spam. Unsubscribe anytime.
Instructions
- Get the pans ready:
- Line three 8-inch pans with parchment and coat with a smear of butter—there’s a simple pleasure in tracing perfect circles for the bottom.
- Mix the dry ingredients:
- Sift together flour, sugar, baking soda, salt, and cocoa in a large bowl, making sure every speck is light and blended—your arms may get dusty and that’s part of the fun.
- Stir up the wet ingredients:
- In another bowl, whisk the oil, eggs, buttermilk, rosé, vanilla, and vinegar until the color turns rich and glossy.
- Combine batters and tint:
- Pour wet into dry and use a gentle hand to mix until just combined, then swirl in the gel color little by little until the batter blushes pink.
- Divide and bake:
- Evenly scoop batter into the pans and tap them on the counter before baking for 30-35 minutes—the kitchen will soon smell like wedding day dreams.
- Cool the layers:
- Let cakes rest in their pans for about 10 minutes, then turn them out onto a rack; resist the urge to decorate while they’re warm.
- Whip the buttercream:
- Beat room temperature butter until pale and fluffy, then gradually add powdered sugar, beating and scraping down the bowl as you go.
- Add rosé and finish the frosting:
- Beat in the rosé, vanilla, and salt—pause to taste, and adjust the wine or sugar to suit your mood.
- Assemble the cake:
- Level cooled cakes if needed, layer them with generous swoops of buttercream, and chill after the crumb coat to lock in the crumbs.
- Mix the drip:
- Melt white chocolate chips with cream, stirring until silky; after cooling, stir up your edible gold paint in a tiny bowl.
- Add the gold drip:
- Cascade the cooled chocolate over the cake, nudging it to drip down the sides—once set, brush each drip with your gold paint for a dazzling finish.
- Decorate and serve:
- Add extra gold accents or rose petals while you grin at your work—slice and serve whenever you need a touch of celebration.
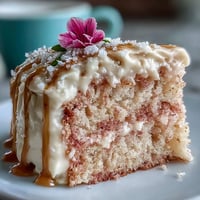
 Pin it
 During the shower, watching guests pass slices of this pink velvet beauty under the twinkle of fairy lights made everything feel a little more golden. Each bite became part of the celebration itself, with crumbs and giggles scattered across the table like confetti.
Making the Gold Drip Shine
Mixing that first swirl of luster dust after painting the drips is one of those tiny kitchen thrills. Use a soft, new food-safe brush and let the chocolate set fully for the best metallic finish—the transformation is nothing short of magical.
Choosing the Right Rosé
I always reach for a dry rosé that tastes fresh on its own; if you’d drink it, you’ll love it in your cake. The subtler the flavor, the more it complements the buttercream instead of overpowering it.
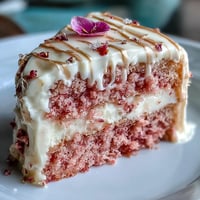
Decorating Like a Pro (Even If Youre Not)
Perfection isn’t required for this cake to look enchanting—let the drips fall naturally and have fun fussing with gold flakes or a few edible flowers. Little accidents become happy accents, and each cake ends up totally unique.
- Hold your cake at eye-level to watch the gold drip pattern develop.
- Scatter rose petals or berries only after the drip sets.
- If in doubt, an extra dusting of luster dust hides imperfections like a charm.
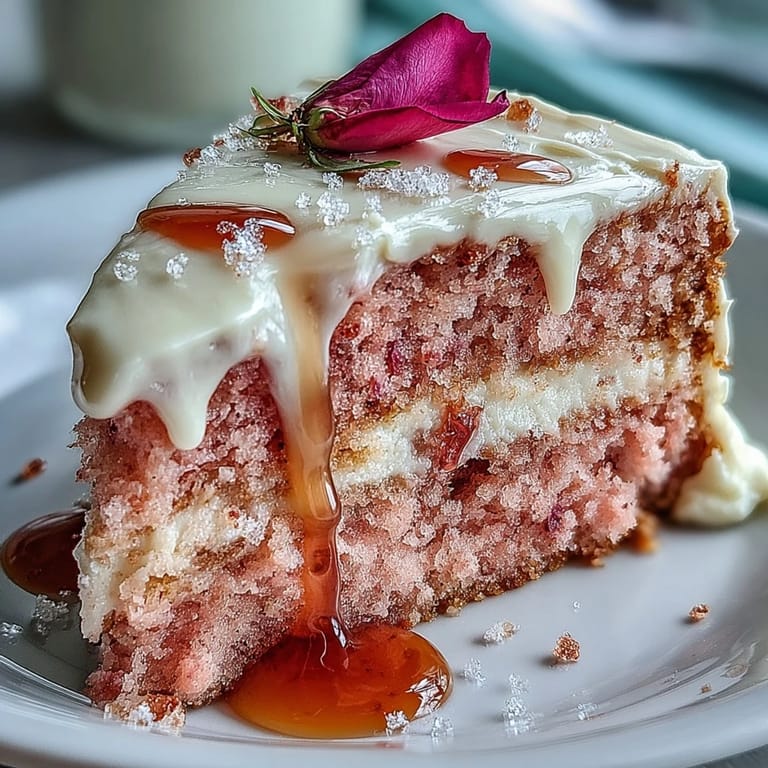
 Pin it
 I hope this cake brings a little ceremony to your celebration, sparkling gold included. Sharing it tends to create memories as beautiful as the cake itself.
Frequently Asked Questions
- → Can I use sparkling rosé instead of still?
Yes. A dry or sparkling rosé will both add a subtle floral note; if using sparkling, fold gently to avoid overworking the batter and monitor liquid balance—reduce other liquids slightly if the batter seems too loose.
- → How do I get even layers and a flat top?
Weigh or evenly divide batter between pans, tap pans to release air, and bake until a toothpick comes out clean. Cool in pans briefly, then level cooled layers with a serrated knife or cake leveler for uniform stacking.
- → How can I stabilize the rosé buttercream?
Use softened unsalted butter and beat until light, add powdered sugar gradually, and limit the rosé to a few tablespoons. Chill the buttercream briefly if it becomes too soft, or add a bit more powdered sugar to firm it up.
- → Is edible gold luster dust safe to use?
Only use luster dust labeled edible or food-grade. Mix it with a small amount of vodka or clear lemon extract to make a paint, and avoid cosmetic or non-edible metallic products.
- → How do I prevent a runny gold drip?
Cool the white-chocolate drip until slightly thickened before applying and chill the cake after a thin crumb coat. If the drip is too loose, add more melted white chocolate to thicken and test drops on the edge before decorating.
- → What is the best way to store and serve the cake?
Refrigerate the decorated cake for up to 24 hours; bring to room temperature before serving for best texture. Layer components can be made ahead and chilled or frozen separately for longer storage.