 Save
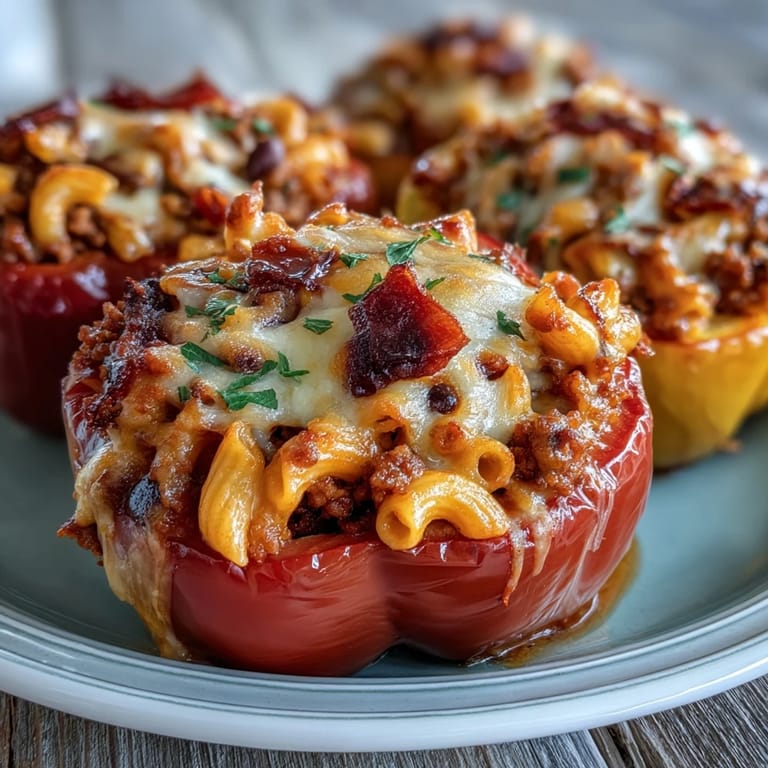
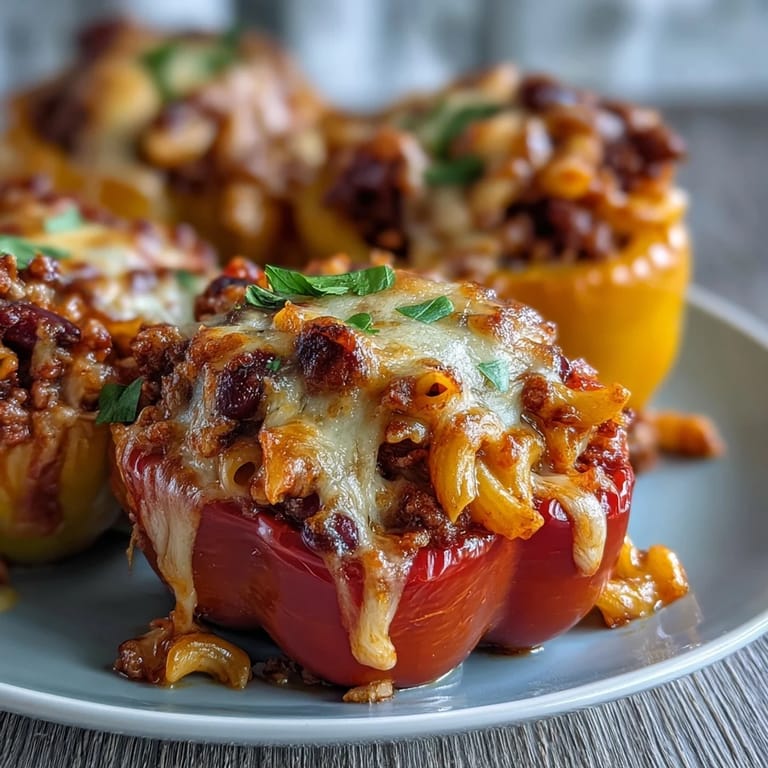
Save There's something magical about watching someone's face light up when they realize a bell pepper just became dinner instead of a side dish. I stumbled onto these stuffed peppers during one of those nights when my fridge had random ingredients staring back at me, and somehow chili mac felt like the answer. Now they're my go-to when I need something that looks impressive but doesn't demand hours in the kitchen.
I made these for my neighbor once when she was overwhelmed with work deadlines, and she called me three days later asking for the recipe because her kids asked for them again. Watching a busy parent get a break and actually enjoy dinner with her family made me realize this isn't just comfort food, it's a gift you can bake.
Ingredients
- Bell peppers (4 large, any color): Choose sturdy ones that stand upright without wobbling, and don't worry if they're not perfectly symmetrical.
- Elbow macaroni (3/4 cup): Whole wheat adds nuttiness, but regular works just fine if that's what you have on hand.
- Olive oil (1 tablespoon): This is your foundation for building flavor, so don't skip it or substitute with cooking spray.
- Yellow onion (1 small, finely diced): Mincing finely helps it disappear into the chili and distribute sweetness evenly.
- Garlic (2 cloves, minced): Fresh garlic makes all the difference, and you'll smell it the moment it hits the oil.
- Ground beef or turkey (1/2 pound): Turkey is leaner, but beef gives you richer, deeper flavor if you're not watching calories closely.
- Black beans (1 can, 15 oz): Always drain and rinse to reduce sodium and remove that metallic taste.
- Diced tomatoes (1 can, 14.5 oz with juices): Keep the juice in there because it's liquid gold for moisture and acidity.
- Tomato paste (1 tablespoon): This concentrated umami bomb transforms the whole mixture into something deeply savory.
- Chili powder, cumin, paprika (1 tsp, 1/2 tsp, 1/2 tsp): These three together create that warm, familiar chili flavor without being overwhelming.
- Salt and black pepper (1/2 tsp salt, 1/4 tsp pepper): Taste as you go because every brand of canned tomatoes varies slightly in saltiness.
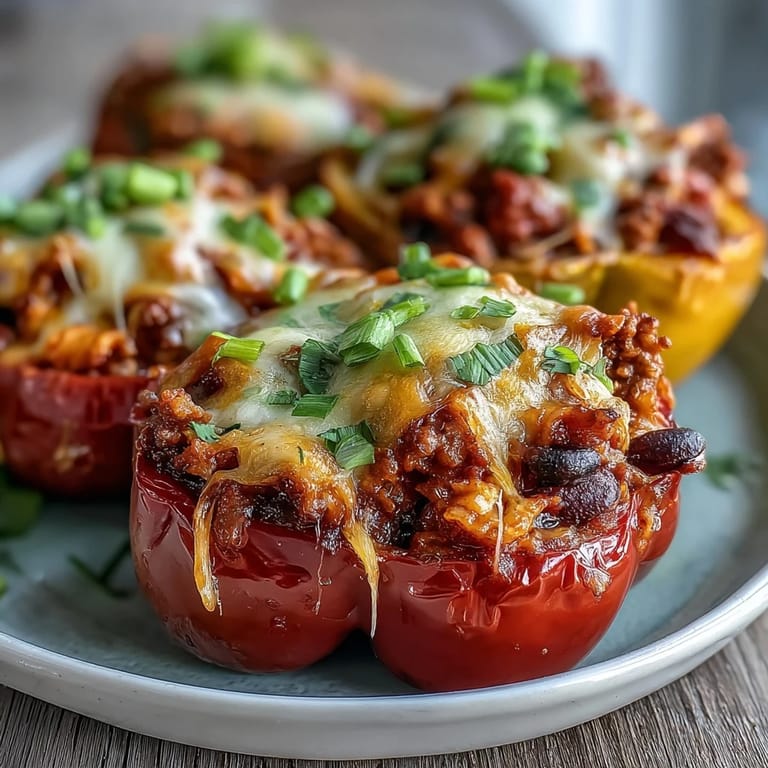
- Sharp cheddar cheese (1 cup, divided): Buy a block and shred it yourself if you can, as pre-shredded contains anti-caking agents that make the melt less creamy.
- Fresh cilantro and green onions (optional): These brighten everything up at the end, but honestly, the dish is complete without them.
Tired of Takeout? 🥡
Get 10 meals you can make faster than delivery arrives. Seriously.
One email. No spam. Unsubscribe anytime.
Instructions
- Get your oven ready and prep the peppers:
- Preheat to 375°F and lightly grease your baking dish so the peppers won't stick. Carefully slice the tops off each pepper and scoop out the seeds and membranes, creating a sturdy vessel without damaging the walls.
- Cook the macaroni to just-right:
- Bring salted water to a boil and cook the pasta 1-2 minutes under the package time so it stays slightly firm. Drain and set aside, knowing it'll soften more during baking.
- Build the chili base with aromatics:
- Heat olive oil in a large skillet over medium heat, then add diced onion and sauté until it turns translucent and starts to soften, around 3 minutes. Add minced garlic and stir constantly for 30 seconds until it becomes fragrant.
- Brown the meat thoroughly:
- Crumble ground beef or turkey into the pan, breaking it up with your spoon as it cooks for 5-6 minutes until no pink remains. Drain any excess fat if the meat released a lot of liquid.
- Create the chili flavor with spices and beans:
- Stir in black beans, canned diced tomatoes with their juice, tomato paste, chili powder, cumin, paprika, salt, and pepper. Let it simmer for 5 minutes, stirring occasionally so nothing sticks to the bottom.
- Combine pasta with the chili mixture:
- Remove from heat and stir in the cooked macaroni along with half the cheddar cheese, mixing until everything is evenly coated. The warm pasta and chili will start melting the cheese slightly.
- Fill the peppers with confidence:
- Stand each prepared pepper upright in your greased baking dish and spoon the chili mac mixture evenly into each one, pressing gently to pack it in. Don't overfill or the mixture will spill out during baking.
- Top with the remaining cheese:
- Divide the rest of the cheddar among the four peppers, piling it generously on top so you get that golden bubbly crust. Add 1/4 cup of water to the bottom of the baking dish, which creates steam and keeps the peppers moist.
- Bake covered, then finish uncovered:
- Cover the dish with foil and bake for 30 minutes, then remove the foil and bake another 10 minutes until the peppers are tender and the cheese turns golden brown. The peppers should yield easily when pierced with a fork.
- Rest before serving:
- Let the peppers sit for 5 minutes out of the oven so the filling sets slightly and becomes easier to handle. Garnish with fresh cilantro and sliced green onions if you want brightness and freshness.
 Pin it
 My sister brought her new partner over for dinner and made these stuffed peppers, and I watched him realize that he'd been sleeping on vegetables his whole life. There's something about food that bridges people together without any awkwardness, and these peppers do exactly that.
Why This Became My Weeknight Lifesaver
Before I started making these, weeknight dinners felt like a constant negotiation between what I wanted to cook and what would actually get eaten. These stuffed peppers changed that because everyone at the table gets something they love, and I get the satisfaction of knowing I packed vegetables, protein, and whole grains into one tidy package. The best part is how they look when you pull them from the oven, golden and bubbling, which somehow makes Tuesday feel special.
Storage and Reheating Magic
These peppers keep in the refrigerator for up to 4 days, and honestly they taste better after they've had time to sit because all those flavors get to know each other. Reheat gently in a 350°F oven for about 15 minutes covered with foil, or microwave individual peppers for a quick lunch. Freezing works too, though the texture of the pepper becomes slightly softer after thawing.
Ways to Make It Your Own
The beauty of this recipe is how much room it leaves for your own kitchen personality and what you have on hand. Swap in kidney beans or pinto beans for the black beans, use ground turkey for something leaner, or skip the meat entirely and add extra beans or plant-based crumbles for vegetarian versions. Heat it up with diced jalapeños or a splash of hot sauce stirred into the chili mixture, serve alongside a simple green salad to balance the richness, or add garlic bread for extra decadence, and remember that your version is the right version because you made it with intention.
 Pin it
 These stuffed peppers have become my answer to the question I ask myself almost every evening, and they always deliver comfort without drama. Make them once and you'll understand why they earned their place in my regular rotation.
Frequently Asked Questions
- → Can I make these stuffed peppers ahead of time?
Yes, you can assemble the stuffed peppers up to 24 hours in advance and store them covered in the refrigerator. When ready to bake, add the water to the dish and proceed with baking instructions, adding an extra 5-10 minutes if baking cold from the refrigerator.
- → What other pasta shapes work well in this dish?
While elbow macaroni is traditional for chili mac, small pasta shapes like shells, cavatappi, or small penne work beautifully. Just ensure the pasta is cooked slightly al dente since it will continue cooking in the oven.
- → How do I know when the peppers are done baking?
The peppers are ready when they're tender when pierced with a knife, the cheese on top is melted and lightly golden, and the filling is hot and bubbling. This typically takes about 40 minutes total baking time.
- → Can I freeze these stuffed peppers?
Absolutely. Let them cool completely, wrap individually in plastic wrap and foil, then freeze for up to 3 months. Thaw overnight in the refrigerator before reheating in a 350°F oven until heated through.
- → What's the purpose of adding water to the baking dish?
The water creates steam in the covered dish, which helps cook the peppers evenly and prevents them from drying out during the initial covered baking period. This technique ensures tender peppers every time.